5 steps to sorting out your makeup stash
By Delaney Loane
Digital Beauty Editor / July 06 2021

Get ready for your glam room game to make Kylie proud
By Delaney Loane
Digital Beauty Editor / July 06 2021
Well, we've suddenly got a bit more time on our hands haven't we? All those annoying admin jobs you’ve been swearing you'll do “when you have time” (AKA finally sorting through your makeup stash) suddenly feel like they… should be done. Ugh, we know.
But hey, just think of the satisfaction you'll feel; both of a job well done, and when you can actually find the one lipstick you're searching for among a sea of many in mere seconds. Basically, what seems like a burden can actually be a damn blessing with the right strategy and supplies on your side.
So, if you're ready to take your chaotic cosmetics collection into 'Kylie Jenner glam room' territory, here's how to do it...
1
Edit
Here's an important reminder before you panic: You're allowed to own and enjoy however many beauty products you want. If you use them or just absolutely love them, they've got our seal of approval. But try to be realistic during the editing process nonetheless: If they don't spark joy (that's for you, Marie Kondo) or serve a purpose, then they're simply wasting precious space. Precious space you could fill with new products once you're done if your hoarding heart desires. Okay no, nix that; no hoarding allowed. Just innocent, organised possession of the makeup buys that you legitimately want, need and use in your life.
Start by binning anything that's expired (here's your guide to decoding those dates), as well as anything that's basically empty (no, you won't use that last crumb of bronzer sitting loose in the compact). The goal is to go into the second step with things that can legitimately be picked up and used, ideally with enough product in it to last long-term. Try to also keep in mind the fact that you're either trying to fit your collection into existing storage items, or will need to find adequate systems to hold everything, so you don't have to be cut-throat, but you do need to be realistic about what your space and budget will allow for.
2
Categorise
Categories are right up there on chaos' list of enemies, and that's why we love them. If everything has a 'section' it belongs in, then it's easy to put it back where it belongs. Your personal categories completely depend on your routine, preference and product stash, though, so go as specific or broad as suits you.
For example, someone who enjoys applying a full-face beat on a daily basis could dial in on smaller, more specific categories such as 'lip gloss', 'lip balm', 'lipstick', and 'liquid lipstick' or even colour-centric categories like 'bright eyeshadow palettes' and 'nude eyeshadow palettes'. Whereas someone with a more low-key approach may stick to broader ones like 'base', 'eyes' and 'lips'. You might also prefer to break down your supplies by purpose rather than product, e.g. 'everyday makeup' vs. 'special occasion/evening makeup'.
By dividing your products into these categories early in the process, you'll be able to better assess what you have the most of vs. the least of, and put together the most effective storage strategy possible.
3
Clean
Would you put away dirty clothes? No (we hope); so don't put away dirty products either. For everything from palettes to bottles, a quick wipe-down (with a cloth or disinfectant wipe depending on the delicacy of the packaging) should do the trick. Just get off any spills, stains or residue, and you'll be good to go. Don't forget to get inside the lids, though; they're breeding grounds for bacteria.
Cleaning your brushes is of course a heftier task, but boy will it be worth it once it's done. With a build-up of product, the accumulation of bacteria from your face and even the small particles of dust and dirt in the air, an unwashed makeup brush is A) not working as well as it could to buff, blend and perfect, and B) putting all that gunk back onto your face, which can lead to breakouts and congestion. Moral of the story: Wash your brushes, no matter how annoying it is to do so.

One of the easiest ways to wash is with a brush cleaner (we love this Clinique Makeup Brush Cleaner, FYI), a good podcast in the background to keep you entertained, and of course, a handy brush mat.
Not only are mats (like this stellar Sigma option) great for ridding brushes and sponges of every last bit of grime, but they keep the mess under control, and make the whole thing way simpler.
This particular mat suctions to your sink and is made of gentle silicone that allows you to swirl all the dirt, oil and build-up off of your brushes without damaging them. To be safe, though, there are multiple different texture areas to choose from depending on the brush you're washing.

In a time crunch? Or just too lazy to commit to a mat cleanse? Give this clever device a go. It's practically makeup brush-cleansing magic, giving your tools the brush equivalent of a wash and blow-dry within the little bowl.
Wondering how on earth that actually works? Allow us to explain. You pop your brush in (with a little water and cleanser), tap it a few times at the bottom of the bowl to get off initial residue, then start the 'spin' function which delivers a deep clean.
Once your brush is fresh, you use the drying spin option to blast it with air, and then draw it out, fresh clean and dry. There are different silicone 'collars' for the bowl, too, so it'll work for an array of brush sizes.
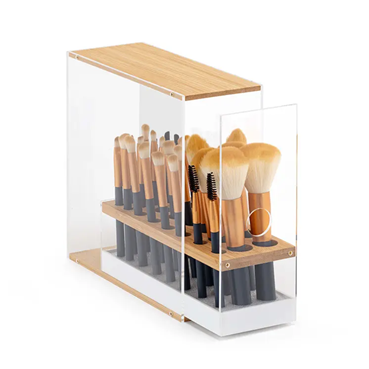
Post-wash, you want to keep your brushes as protected as possible to allow them to stay fresh for longer. Instead of just tossing them into your makeup bag, house them in a dedicated brush holder.
Bonus points if you find an option that limits exposure to the elements. Anything with a lid will keep the bristles away from dust and dirt; two things that aren't welcome on our brushes or our faces.
And hey, it doesn't hurt if it looks a little bit schmancy on the old vanity like this acrylic and bamboo option.
4
Store
So your supplies are edited down, organised into categories and clean as whistles; it's time to decide where they're going to live. A quality organisational system is both practical and pretty, so do your best to work out solutions that look chic but also make everything super accessible.
Try and think about what you reach for most often; for example, your daily foundation probably needs to be easier to grab quickly than your Christmas-specific gingerbread palette. However, you obviously want to know precisely where that bad boy is, just in case you're feeling festive.
Personal preference is obviously a major player in the product-housing department, but as a general rule, acryclic items are storage superstars; they allow you to see what you're working with, but still keep everything neatly contained.

There's a reason these kinds of acrylic drawers feature in almost every 'glam room' to ever exist; they're equal parts aesthetic and useful.
The drawers allow you to keep categories in order (one drawer for base, then one for cheeks, lips, eyes, etc.), and most come with drawers of different heights, to fit everything from larger products like liquid foundation bottles to smaller ones such as single eyeshadows or lipsticks.
Our top tip? Work your 'everyday essentials' into one of these and keep it close to your mirror. We're big fans of this chic diamond-handled luxury buy, but there are a ton of affordable options out there, too.

Wider items like palettes can be tricky to store (as they won't all fit into trays or drawers the same way smaller items will). Once you get a palette-specific holder into your life, however, it'll be an absolute breeze.
Don't be fooled into thinking these are just for people with extensive eyeshadow collections; think of all the other items that come in palette form: Blush, bronzer, highlighter, colour corrector, concealer, lipstick, etc; the list goes on.
Yes, it might take up a little more room than a flat-packed pile of them, but the acrylic separators allow you to do two very important things: Make each one accessible no matter what kind of hurry you're in, and display your prized palette possessions in all their glory.
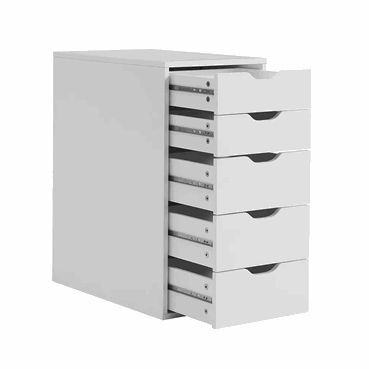
If you're a big beauty junkie, chances are you have more than just your everyday products to deal with, right?
Larger storage systems like these drawer units are perfect for taking your organisation game up several notches if space allows.
This style of drawer unit being super popular is a blessing, because a bunch of makeup-specific drawer dividers and organising trays are designed to slot right in.
The mix of short and tall drawers is genius, too, because the short allow for items that can be stored horizontally (lipstick, eyeshadows, concealers) while the deeper ones can house products that need to stand, like setting sprays and fragile foundation bottles.
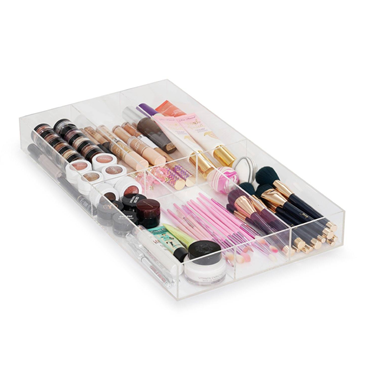
Working with a makeup table or storage system that already offers drawers (like the above one)? Aforementioned acrylic trays are dynamite for keeping your categories organised and looking top notch. Just be sure to measure your drawers carefully (for height, depth and width) and you'll be off to the races.
They're great for housing everything from your hefty lippy collections to the lash glue and spoolie stashes you just don't know what to do with.
Their sections offer size variation that allow for endless options. Have twice as many nude lipsticks as you do red? No worries. Use a smaller compartment for red and a larger one for nudes. Or if you want to work with separate trays rather than a big one that's already been divided up, try these stackable guys instead.
5
Label
You may think that muscle memory will kick in and guide you to the right drawer/box/compartment every single time, but hey, just for the sake of satisfaction, why not polish off the job with a few labels that'll make everything crystal clear? Not only do they give off the energy that everything in your life is as pristinely organised as your makeup (HA!), but they just look damn chic.
Sure, every storage solution won't need labels (though we're all for whacking an obvious but super organised 'palettes' one on the front of your palette holder), but if you're working with storage you can't see through or into, labels are a must.
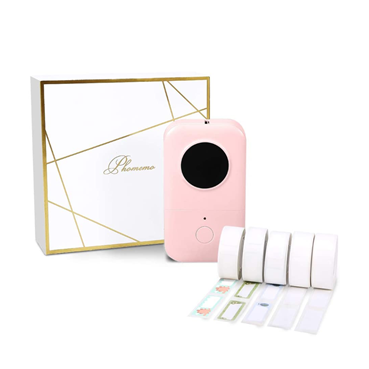
In addition to being outrageously cute as a whole, this little labelmaker connects to your phone via Bluetooth, so you can design any labels you like on the app in minutes.
Once you're happy, you just load in your preferred tape option, press print, and you're good to go. Trust us; the next time you're strapped for time trying to create a sienna smokey eye, you'll thank your past self for labelling the 'bright eyeshadow' drawer/container.
Main image credit: @luvostore
Looking for more tips on how to get your beauty products in order? Here's how Chloe Morello stores her skin care products...


